-
Shop Parts
- Shop Accessories
- Shop Overland
-
Shop by Vehicle
![Select Vehicle]() Select Your Vehicle
Select Your Vehicle - Videos & Resources
Sign in to my account
Rear Shock Replacement Instructions
Range Rover 4.4 HSE Performance Rear Shock Replacement Kit (KONI Option)
Applies To:
Item: 8732
Fits: Range Rover 4.4 HSE

Kit # 8732 - Featuring Premium-quality KONI Shocks
Parts included in Kit# 8732:
- 2 ea. Koni Rear Shock
- 2 ea. "U" Mounting Bracket
- 2 ea. 3/4 x 2-3/4 Bolt
- 2 ea. 3/4 Hex Nut
- 4 ea. Polyurethane Bushing
- 2 ea. Top Mount
- 6 ea. Top Mount Flange Hex Nut
- 2 ea. 7/16 x 2-1/2 Bolt
- 2 ea. 7/16 Washer
- 2 ea. 7/16 Hex Nut
- 2 ea. Lower Mounting Stud
- 4 ea. Lower Mtg. Stud Nuts
Tools needed for kit:
- Floor Jack
- 2 ea. 1-1/8 inch wrenches (for tightening top bolt, step #7)
- 17 mm wrench (or socket)
- 15 mm socket
Shock Absorber Removal:
BACK TO TABLE OF CONTENTS
1. Raise vehicle with rear wheels hanging.
2. Remove wheel and support suspension with floor jack as seen in Figure #1.

Figure 1
3. Remove the bolt securing the lower end of the shock. (See Figure 2)
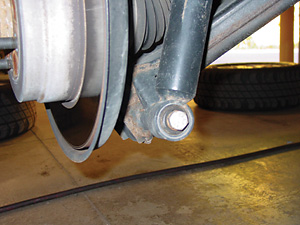
Figure 2
4. From inside the vehicle, remove the cover over the spare tire.
5. Remove the tie-down bracket and spare tire strap anchor, and pull the carpeting up to gain access to the shock absorber top mounting nuts. (See Figure 3)

Figure 3
6. If you don't mind making a tear in the carpeting (it won't show when the spare tire cover is in place), you can pull the carpeting back without removing the tie-down or anchor. (See Figure 4)

Figure 4
7. Remove the 3 nuts securing the shock and maneuver the assembly out of the vehicle.
Shock Absorber Installation:
BACK TO TABLE OF CONTENTS
1. Install the mounting Bolt/Stud into the lower shock mount on the lower suspension arm. (See Figure 5)

Figure 5
2. Assemble the top mount onto the shock as shown in the following diagram. (See Diagram A and Figure 6) Make sure that the axis of the "Thru-Bolt" (part # B) is in line with the longer part of the top mount.

Figure 6
- A. Koni Shock
- B. 3/4" x 2-2/3" Bolt with Nut
- C. Shock "U" Bracket
- D. Poly Bushing
- E. Top Mount
- F. 7/16" x 2-1/2" bolt with washer and nut
3. Examine the orientation of the stud mounting pattern by looking up inside the shock tower. (See Figure 7)
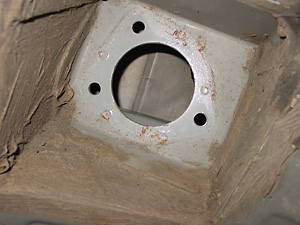
Figure 7
4. Turn the top part of the shock to align the stud orientation to the mounting pattern as seen in step # 3 above (align the bottom mount to be parallel to the lower mounting stud). Collapse the shock to it's shortest length and maneuver the unit into position over the lower mounting stud. This will be a "challenge," but it will fit into place. (See Figures 8 & 9)

Figure 8

Figure 9
5. Install nut and leave loose, for now. Extend the top part of the shock upward until the studs come through the mounting holes. (Note: It might help to have an assistant for this step, who can adjust the top mount orientation as you extend the shock.) (See Figures 10 & 11)
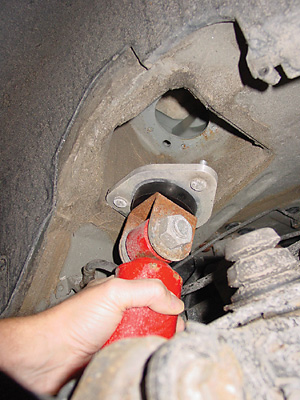
Figure 10

Figure 11
6. Tighten the 3 nuts on the top mount to 56 Nm (40 lbf.ft) Tighten the nut on the lower arm to 110 Nm (81 lbf.ft) (See Figure # 12)

Figure 12
7. Tighten the nut on the through bolt securing the top mount to the top mounting eye of the shock. You will need 2 each 1 1/8 inch wrenches. (See Figure 13)

Figure 13
8. Install the tire, lower the vehicle, put the carpeting back to it's original position, and put the cover over the spare tire.
What Our Customers Are Saying


