-
Shop Parts
- Shop Accessories
- Shop Overland
-
Shop by Vehicle
![Select Vehicle]() Select Your Vehicle
Select Your Vehicle - Videos & Resources
Sign in to my account
Rear LED Lamp Ballast Resistor Kit for Range Rover Sport (L320) MY 2006 - 2009
Applies To:
Item: RLLBRK-2
Fits: Range Rover Sport | '06 - '09 (L320)
Parts included in Kit #RLLBRK-2:
- In-Line Ballast Resistor Wiring Harness ( 2 each )
- Alcohol Swab Pad ( 2 each )
Tools Needed for Kit #RLLBRK-2:
- Phillips Head Screwdriver
- Plastic or cloth covered Pry Tool
Installation Procedure:
1. Raise the rear hatch, allowing access to the screws holding the Tail Lamp Assemblies in place.
2. Remove Rear Tail Lamp Assembly (Right Hand Side Shown) by removing the 2 screws, and popping the front-most end of the assembly with the pry tool. (See Figures 1 & 2)

(figure 1)

(figure 2) Cover pry tool with cloth to protect finish
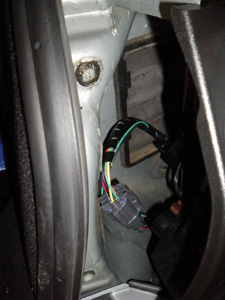
3. Pull the Tail Lamp Assembly away from the vehicle, so you can see the connectors. (See Figures #3 & 4)

(figure 3)

(figure 4)
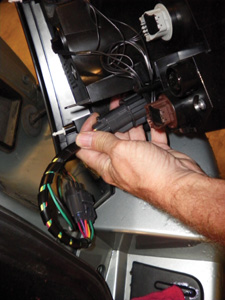
4. Disconnect the wiring harness from the Tail Lamp Assembly by pushing in on the tab, and gently pulling the connector apart. (See Figures # 5 & 6)

(figure 5)

(figure 6)
5. You are going to glue the ballast resistor to the flat area just beneath the Tail Lamp Assembly. (See Figure # 7)

(figure 7)
6. For the thermally conductive high-strength adhesive to adhere to the vehicle, you will need to thoroughly clean the area, first with a cleaning cloth, then with the alcohol pad supplied with your kit. (See Figures # 8 & 9)

(figure 8)

(figure 9)
7. Plug one of the RLLBRK-2 wiring harnesses onto the vehicles wiring harness. You should hear a "click" when the to halves are fully connected. (See Figure # 10)

(figure 10)
8. Remove the blue protective plastic from the resistor adhesive pad. (See Figure # 11)
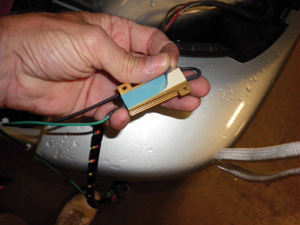
(figure 11)
9. Position the resistor to the clean, flat area beneath the Tail Lamp Assembly area as shown in Figure # 12. Make sure to press the resistor firmly so the adhesive will take hold.

(figure 12)
10. Connect the free end of the RLLBRK wiring harness to your LED Tail Lamp Assembly. (See Figure # 13)
(figure 13)
11. Tuck the wires safely in behind the Tail Lamp such that nothing is interfering, and no wires are pinched. (See Figure # 14)
(figure 14)
12. Snap the Tail Lamp in place and secure with the 2 screws. (See Figure # 15)

(figure 15)
13. Repeat for the other side.
What Our Customers Are Saying


